
Module 6- Part 3: Drills for ‘thinking differently’
Benji
Drills for ‘Thinking Differently’
NOTE: In this section, I’ll talk about the process we went through in the Live Session. Since so much of it was purely ‘on the spot,’ I didn’t prepare any notes beforehand. As a result, I’m writing this purely from memory.
Here’s a fun game to play that will get you thinking about the memorized deck in all kinds of new ways…
Grab all your various magic props, gimmicks, and trinkets and assemble them on your card table.
And just for good measure, grab a few random items that aren’t even magic-related—don’t even TRY to think about it, just grab them.
Prior to the Live Session, I did the same thing and settled on:
- Rubik’s Cube
- Sponge Balls
My goal when doing this is to find objects that, at first glance, other magicians might say…
“There’s literally no way a memorized deck can be relevant to this.”
…yet later, they’re forced to admit that we actually made something pretty special with it.
And at first glance, a Rubik’s Cube seems to fit that criterion. (so do the Sponge Balls.)
My first port of call is to list ALL of the ideas whirling around in my head in relation to the current prop and how it might relate to the memorized deck.
It doesn’t matter how ‘good’ any of these ideas are. The aim is just to connect pen with paper and let your ideas flow onto the page.
As you do this, you’ll automatically spark more ideas.
How?
I once heard Danny Garcia say that by writing down his bad ideas, he freed up the mental space for the good ideas.
For me, I find that writing down one idea can often have a ‘domino’ effect. I write down one idea, and as I do so, it makes me think of another idea—related but different. And as I write that one down, it too sparks another idea. The whole thing then starts ‘branching’ out and you end up with a whole bunch of ideas from the original one.
It’s like playing the classic ‘word association’ game. Someone says a word, and you reply with the first word that comes to your mind, to which they reply with another word, and so on.
By the end of it, you might be naming things entirely unrelated to the initial prop—but you had to go down that path to get there.
We’re playing that game, but with ourselves. The effect we eventually settle on might have nothing to do with the original prop, but we had to go down that path in order to reach it.
Hence why you should write down ALL your ideas—you don’t know in advance what road they’ll lead you down and what discoveries you might make.
For example, with the Rubik’s Cube.
We went down two paths.
The first one was a random idea that wasn’t anything knockout, but a decent exploration nonetheless.
Path 1.
Someone names a card. Someone else mixes up a Rubik’s Cube. Then someone freely names any color on the cube and picks a side. We count the number of squares containing that color, deal down that number in the deck, and reveal the named card.
How?
Using the ‘open index’ principle, we can estimation cut the named card to somewhere within the top 3-5 cards.
This means we can afford to be less precise in our estimation cut—and in most cases will only need to cut the cards once.
When we studied the mixed-up Rubik’s cube, we found the ‘average’ number of squares of any given color to be 3.
So if our card is in the 4th position, for example, it doesn’t matter what color they pick—chances are the number will end up being ‘3’. We can then deal 3 cards and show that the next card on the deck is the named card.
Of course, we’re also covered for different numbers. If the number was 2, we could deal 2 and double lift. If the number was 4, we could deal 4 and show the 4th card.
If there’s only 1 square, we could ‘jazz’ our way there by having multiple spectator’s select colors. The first spectator might select a color with 1 square, and the second might select a color with 2 squares. We would then deal 3 cards (1 + 2) and show the card left on the deck is the named card.
Or we could use a technique I picked up from Asi Wind’s work. Ask each spectator what their favorite color is. Then, after the cube is mixed, we note how many squares there are of each color on a given side.
We force that side using a timing force. Then, we force the most convenient color by asking the spectator to name a color. They’ve already told us their favorite color, so this should be a direct hit. If not, it’s fine—use one of the other methods we’ve been discussing. (wording like “you have a color in mind?” might be better than “choose a color” since it references the fact they already named a color earlier and can be interpreted as either a question or a statement.)
If all else fails, the worst-case scenario is we just shift a few cards.
We could also see if any of the color numbers coincide with Quartet distance numbers. It might be possible to deal to a Four of a Kind by forcing a sequence of colors where we know the number of colored squares lines up with our distance numbers.
Another option might be to have a preset cube where you know exactly how many color squares are on each side for each possible choice. We can then ‘false shuffle’ the cube (yes, that’s a thing) and then have them freely pick a color. Whatever they name, we know how many squares there are in that color, and can cut a card into that position.
Finally, we could also use a similar principle to ACAAD. Get two spectators to each pick a color, see what numbers come up and see how much room we have with them.
For example:
Spectator 1: Red (4 squares)
Spectator 2: Blue (2 squares)
From that, we could come up with all the following numbers:
4 (by just using spectator 1, promising spectator 2 we’ll return to them)
5 (deal 4 and show the card left on deck)
6 (deal 4 and double lift card left on deck)
7 (deal 4 and triple lift)
3 (deal 4 cards into new pile and double lift top card of new pile)
For the rest of these, refer to the methods in the brackets.
2 (see above but the opposite)
3
4
5
24 (combining 2 and 4)
25
26
27
23
42 (combining 4 and 2)
43
44
45
41
8 (4 x 2)
9
10
11
7
6 (4 + 2)
7
8
9
5
That’s 20 possibilities. And then when you factor in the fact that we can use all those numbers but count from the face-up portion, we increase our chances even more!
Remember what I said about ideas occurring to you when you write stuff out? That’s exactly what just happened with those last few.
Anyway, it’s nothing crazy, but a nice way to warm up the creative muscles.
Path 2.
Here’s another fun idea, again using the ‘open index’ principle.
We start with a mixed-up cube. They name any card. We promise them we’ll come back to that, but we want to start with something else first.
We display the mixed cube and force them to pick the color red.
How?
We could do a timing force—running a finger over the squares of the cube, making sure we stop on a red.
But here’s the way I would handle it:
We’re using a single deck (a red deck with blue double backers)…
Keep the cards in the case, and draw the focus to them (not the cube) as you ask for “red or blue?”
If they say ‘blue’, you have a nice little moment where you show it’s a blue deck. It’s a 50/50, of course, so don’t try to sell it as the main effect—it’s more just a fun, offbeat ‘moment.’
Now you say: “You might be wondering what might have happened if you’d said red. I’ll come back to that…” (foreshadowing the coming color change.)
If they say ‘red’, say “interesting. I’m using a blue deck, but I’ll see what I can do…”
Later on, when the cube and deck change color, we’ll be able to use this line as a motivation for the color change. (“But you wanted red, right? Watch what happens when I do this…”)
Either way, we want to bring the attention back to the cube now. We take it, displaying its shuffled nature, and place it on the centre of the table. We then pick up a paper bag, which we proceed to place the cube inside. Then we tell the audience that “to make sure I don’t do anything sneaky and switch the bag, I’ll also leave one of our cards inside.”
We take a card off the deck and place it inside the bag, on top of the cube.
We pause for a minute.
“Red, right? That’s the color you want?”
After a moment, we remove the paper bag from around the cube, isolating it on the table.
To the astonishment of the audience, each square of the cube on the face of the cube has transformed to the chosen color, red.
Even more astonishingly, the blue card we placed in to ‘verify’ the cube has also changed color from blue to red.
But the astonishment doesn’t end there…
You turn the rest of the deck face down and spread the cards—revealing that EVERY card in the deck turned red too.
Surely that’s more than enough astonishment for one day?
If you’re thinking that, here’s where you’d be wrong…
We then pick up the cards and spell the chosen color, ‘red’.
The final card is, of course, the card named right at the beginning.
What’s gone on here?
Recall that the red deck had a blue double backer on top. This was the card we picked up and placed in the paper bag with the cube. Naturally, all we had to do was flip the card as we placed it inside.
(The cube is also taken care of by this point.)
NOTE: I’m not going to go into detail on the method for the cube side of this. I personally love Cube 3 by Steven Brundage, but really, any Cube product that will allow you to instantly transform it from mixed to solved will work. Cube 3 is good because the method will also allow you to instantly solve just one side—in our case, the red side.
Furthermore, since the rest of the deck was red anyway, the reveal couldn’t be simpler. When we removed the double backer in the first place, we did so without exposing the red face down cards—by placing the red face down cards face up on the table. Then, at the end, we just need to turn the cards over and spread.
But here’s the other piece of the puzzle:
The deck is in memorized order.
Our job is to use the ‘open index’ principle to place their named card third from the top without their realisation that anything remotely untoward has transpired.
Here’s two potential methods for doing so (feel free to experiment with your own)…
- We cut their named card into the third position via a face up estimation cut. Hold the deck face up, holding a break beneath the bottom card (our double backer). Estimation cut using a double undercut, but slide the right hand packet above the break. So we’re inserting the cut off packet in between the bottom card and the rest of the deck. This allows us to estimation cut as usual,
NOTE: be careful once the bottom card tells you you’re getting close to the named card—since the cards are faced up, we want to make sure it doesn’t appear on the bottom
- Alternatively, we could start by turning the deck face up on the table as if preparing to riffle shuffle the cards. Riffle up the right corner of the deck until you spot the index of the named card (we know roughly where this is so can riffle fast and then slow as we get closer to the spot.) Get a thumb break in that spot. Now lift up the cards slightly and let the bottom card drop to the table, getting a break above that card with the tip of the right thumb. The flesh of the right thumb is engaging the first break, and the tip is engaging the second. Now we strip out the packet between those two points with the left hand. We can now riffle shuffle if we wish, ensuring that the two bottom cards stay together—if we don’t mind disturbing our stack. Alternatively we can just strip it out and complete a cut.
Remember as you do the above procedure that you have the double backer counting as an extra card on top. So if you wanted to place the 3S in third position, you’d get your break above the 2D. The result of that would be that the deck begins with the double backer, then has the JH in second and the 3S in third.
The key thing is, whichever method you choose, it should be over in an instant and not even worthy of attention. You’re simply messing with the cards as you ‘decide’ what effect to perform.
Thanks to this work though, you’ll be able to place the named card third from the top.
In the presentation, once we’ve replaced the double backer on top of the deck and spread, the named card is 3 cards deep. We can then spell ‘red’, one card for each letter, and reveal the named card.
NOTE: originally the idea was to have the entire cube magically transform from mixed to completely solved, with the side facing us entirely red. That presentation definitely works, I just like the ‘purity’ of it ONLY being the reds that get solved.
NOTE: Alternatively, we could simply give them the option of “red or blue?”
We have two decks on us. One is a red-backed deck with a blue double backer on the top. The other is a blue-backed deck with a red double backer on the top. So whichever color they name, we bring out the deck with the opposite color as the double backer.
NOTE: If you want to give yourself more wiggle room with the estimation, we can make this work with the named card 3rd, 4th, 5th or 6th. If it’s 3rd, it’s a direct hit. If it’s 4th, we just don’t replace the double backer on top. If it’s 5th, we don’t replace the double backer and we reveal the card on the deck after dealing. If it’s 6th, we don’t replace the double backer and we do a double lift on the card on the deck.
Again, this is a strange writeup—a combination of ideas I remember jamming on at the time, and a few that occurred to me in the process of writing it up.
With that said, let’s take a look at the second example…
Sponge Balls
Again, we stumbled upon two potential paths using the sponge balls and a memorized deck.
Here they are…
Path 1 – Which Hand style
I have a fascination with ‘Which Hand’ routines, as you may have noticed from the last module.
So that led naturally to a fun way of combining the sponge balls and memorized deck within a ‘Which Hand’ context.
I would present this as a three-phase routine:
- The first phase would use our newfound Sponge Balls.
Using a variety of false transfers, I’d play a game of ‘guess the hand?’ with a spectator, magically winning each round.
For example:
- Begin by doing a false transfer as you supposedly place the sponge ball in your left hand. When they guess, reveal it’s actually in the right hand.
- Do the same from right hand to left hand.
- Then end with the strongest phase: fasle transfer one sponge ball and retain in the right hand, then load it in their hand along with the other sponge ball, getting them to squeeze down on it. To them, it feels like they’re holding just one sponge ball, but you can reveal (after sufficient build up and speculation about the location of your sponge ball) that they’re actually holding both.
- The second phase would use a coin
Then we say “Now, let’s see how well I can guess where YOU’RE holding an object.”
We hand them a coin.
The second phase would be a regular ‘Which Hand’ routine using regular coins. Use your preferred method for this (Tequila Hustler is pretty solid, and my personal favorite is Timon Krause’s.)
- The third phase would use our memorized deck
You introduce the third phase in the following way:
“The issue with using coins is that one hand will always be empty, and the other will always have something in. Some people make it too obvious which hand holds the coin. What if we upped the stakes, so all my ‘influence’ would have to be mental? Here’s how…”
We false shuffle the deck, and then get them to freely cut the cards anywhere, taking the top two.
Now, whichever two cards they took, there should be at least ONE ‘distinguishing’ factor.
The most obvious of these would be that one card is red while the other is black. However, it could be that they are different suits (e.g Clubs vs Spades.) Or perhaps, one is a picture card while the other is a number card. Or, if nothing else, one of them will be higher than the other.
We ask our spectator to tell us this ‘distinguishing’ factor. They are not to tell us which hand holds which, just the difference we’re working with. For example, they might say:
“One of them is red, the other is black.”
We tell them we’re going to ‘influence’ them to keep one of those options and discard the other. To prove it, we take out a pad of paper and write down the option we want them to keep—so our prediction is ‘locked in.’
We’re actually going to use the ‘one ahead’ principle here.
The first round, we write nothing down.
Then we tell them:
“Discard one of them, and place the other on the table. But don’t let me influence you…”
Note which hand they decide to keep. We now know which option they chose.
How?
After they cut the deck, we glimpsed the bottom card. That clued us in to the identity of the top two cards. Then, we saw which hand the top card went in, and which hand the second card went in. Since we know the identity of those cards, we already know the ‘distinguishing’ factor, but we have to play like we don’t since acting any different would give away the extent of our knowledge.
When they discarded a card, we knew the identity of that card. Likewise, when they placed one of the cards on the table—we knew the identity of that card.
So all we have to do is remember what they chose.
Now we’re going to have them do the same thing.
They cut the deck somewhere else, we glimpse, the pick up two cards from the top and decide which to keep (red or black, high or low, hearts or diamonds, etc.).
Again, we act as if we’re influencing them and write down our prediction before they choose.
In fact, we’re going to write down the answer to the PREVIOUS choice.
So if, in the previous round, they chose red, we would write:
“1. Red”
And leave it at that.
We can repeat that as many times as we like, but I find 4 to be a good number.
Here’s what happens in the fourth phase:
This time, we’re going to write the answer that is actually the answer for the previous phase. Then we leave it blank.
Now, it’s time to see how well your predictions lined up with their choices. I’d do this by folding the page so only the answer for 1 is visible.
Read out your prediction, and then flash the paper at them to casually show that you did indeed write that.
They turn over their first card to show it corresponds with your prediction.
Now refold the page so 1 and 2 are visible. Read out your prediction for 2, flash the written prediction, and reveal it matches. Do the same for 3.
Then, for the last card, you pretend to read out a prediction. In fact, you’re just speaking from memory—you know which they chose in the last phase, but had no opportunity to write it down because you actually wrote down the prediction for 3.
So just read the prediction, as if reading it from the sheet, fold the sheet and place it aside, focusing all attention on the card.
Of course, this is a total bluff, but since each of our previous predictions have been correct, and we’ve only briefly been flashing the paper
Besides—as far as they know, there’s no way we could know the card they placed down. Why would speaking a prediction give us more accuracy than writing it?
Either way, we want to treat the paper as unimportant. The important thing is the card on the table—that’s where all the focus should be.
(This is an example of how misdirection is more about ‘focusing attention in the wrong place’ than anything else.)
NOTE: If you want to end ‘clean’ with a piece of paper you can hand out, here’s how I’d handle that.
I’d start the fourth phase by saying you’ll ‘up the stakes’ even further by not speaking to them (in all other phases, we’ve been feeding them patter that is supposed to ‘influence’ them one way or another) and remove ourselves from the room. Once they’ve made our choice, we come back in.
We then do the Tequila Hustler method but with the card, which allows us to gain its identity. We then write down our prediction based on that knowledge. Of course, this would need to be presented a little differently—perhaps we’re trying to influence them to give away the key information by their body language or words. But either way, we can then write down 4, and we have a sheet with all the correct predictions that doesn’t need to be hidden after performance.
So there’s a fun idea.
Funnily enough, the idea of using a memorized deck for the ‘which hand’ routine was the very first half-decent idea I had with it. But the idea of combining it with the sponge balls and coins was something that occurred to us on the spot during the Live Session.
NOTE: To get back to stack, you’ll just need to manually replace 6 of the cards (two of them can go back on the top, since that’s where they were removed from.) The rest of the deck will still be stacked.
NOTE: In the rare instance that they cut to the same location in a later round as they did in an earlier round, just make sure to recall that they already removed two cards from that location. Likewise, an equally rare but still possible scenario would be that they cut to the same place, albeit one card less. The result is that the first card they picked up would follow the stack order, but then the next card would be the card 3 cards later.
For example, if they removed the JH and 3S at one point, and then in a later round they cut to the KC—the cards they pick up would be 2D (19) and 8S (22), not 2D and JH (the JH was already removed.)
If you think you’ll run into trouble remembering which cards were picked up in previous rounds, convert them into images using the PAO method we showed you.
Path 2 – Chicago Opener
The Chicago Opener is one of the most ‘commercial’ plots in card magic. Here’s a fun variation on it using a mem deck and some sponge balls.
We start with a FRACTIONAL amount of ‘arts and crafts.’
I know, I know—very out of character for me. But for once, I was willing to make an exception.
All you do is grab a piece of paper, color in a blue circle (or red, depending what color your sponge balls are) and cut it out.
Now we attach that circle to the back of a random card—let’s say we’re using the KD—using either wax, double sided stick tape, or blu tack.
And of course, our deck is in memorized order.
You’re set up.
Now, the plot we settled upon for this is fairly absurd. I won’t be offended if you radically change it for your purposes. But we found it fun, so it’s the one I’m using in this writeup.
We start by introducing our sponge ball:
“This is my ‘sniffer ball.’ You know how the police have sniffer dogs? Well, this sponge ball has the sniffing abilities of a bloodhound. Here, let me prove it…”
Give the deck a false shuffle. Ask your spectator to name any card. Once they do, place the deck down and return to the sponge ball (actually, we estimation cut the named card to the top, but that’s how it should FEEL.)
We pick up the sponge ball and say:
“Great. He’s about to go sniffing for your card. But don’t blink—when he catches a scent, he’s on it before you can say ‘sniffer.’ Watch…”
You false transfer the sponge ball into your left hand, and hold your left hand over the deck. Strain, as if something is pressing against your hand toward the cards.
“Steady, boy. Alright…go!”
As you say ‘go’, open your hand to show that the sponge ball has vanished.
(In the meantime, while the attention is on the left hand over the deck, you’ve ditched the sponge ball from your right hand.)
Now, slowly spread the cards, saying:
“I think he’s already found his target.”
As you spread through the cards, one by one, you’ll soon come across the card with the blue circle on its back.
(I recommend using a red backed deck so this has maximum ‘pop’)
“Wow! That was fast…”
It’s a humorous moment, so play it like that.
Now remove the card and place it on top of the deck. The motivation I would use for this is so you can tilt the deck down slightly and show the back of the card around.
Ask them to name their card again.
You’re now going to do a double lift to reveal that the named card is apparently the top card. That’s the first reveal.
Now, you’re going to place the named card face up on the table. But make sure you do this without revealing its back, or the face up card beneath it.
Here’s how I’d do that:
Turn the double back over, but keep a break between the two cards and the top of the deck.
Now openly slide your first finger into that break, with the thumb doing the same on the back of the cards. You’ll end up pinching the two cards between first finger and thumb on the right of the card. Now, you’re going to rotate your left hand up, and as you do so, the first finger PULLS while the thumb PUSHES. The net result is that the bottom card of the double slides out and into the open, with its face visible. You pull it all the way free, face up, in one smooth motion, and place it face up on the table.
(I saw this, of all places, in an effect called ‘Tricky Joker’, shared by MisMag. It was used in the opposite way—with the cards starting face up and coming out face down. It’s served me well for years.)
Now, the deck is face up and the bottom card is the card with the blue circle on its back.
We’re going to cut the deck a couple times so that the blue circle is no longer obvious on the top of the deck, then turn the deck face down and place it back on the table.
Tell the spectators:
“That was fast, but I reckon he can do even faster. Why don’t we try with another card…”
Now, we’re going to force the KD (the actual face of the card with the blue circle on its back) on a second spectator. Since we know in advance that this is the card we want to force, we could have a second deck set aside with that card on top, ready for the cross-cut force, or (if you’re so daring) the classic force.
Once that card has been selected, we say:
“Great. The sniffer ball is going to find that card in 3, 2, 1…GO!”
On ‘go’ we turn over the tabled card to reveal the blue circle is gone from the back. We immediately spread the deck to show that the blue circle is on the back of one of the facedown cards.
We remove this face down card, ask the spectator to remind us of the name of their card, and reveal that the sniffer ball has found their chosen card too.
The natural conclusion now is to remove the circle from the card and transform it back to the full size sponge ball. We could do this by finger palming the sponge ball in the left hand, false transferring the paper circle from the right hand to left hand, and revealing the change.
You can experiment with introducing further sponge ball cutouts and adding in extra colors—as indeed we did on the Live Session.
So there we are—4 pretty respectable routines involving a memorized deck and a prop that was, initially, way ‘out there.’
Now, let’s look at some more unconventional ideas—this time involving two people…
Duo Revelations:
As a final exercise in creative thinking, I showed Jacob a list of ideas for performing a card revelation as a duo. The point is showing this list is in showing the different ways one idea can play off another, or how one idea can inspire another—or even surpass it.
Pages 378, 382 and 398 of Juan Tamariz’ Mnemonica all helped spark the initial idea, and then I let my brain ‘run with it.’
(I also later discovered that Danny Crauwels had noted a couple of similar ideas in the ‘ideas to play with’ section of his Maigret system. I was happy to see that I wasn’t alone in my ideas!)
Let me explain…
See, the ‘tier 1’ way of secretly communicating the identity of a card to your partner is generally about communicating the card’s ‘open identity’ to your friend.
For example, saying something like “we could be here for seven days, and I’d be closer to finding a diamond than I would be to finding your chosen card” would encode the information that their named card is the 7D.
Of course, that’s a ridiculous example, and there are far more subtle ways of doing so, but it all comes back to that one disadvantage:
We have to rely on the ‘open identity’ of the card.
Using a memorized deck, we also have a shared ‘secret identity’ known only to us.
We can use that secret identity to communicate the identity of a chosen card to a partner, which adds another layer of deception to the whole thing.
Here’s a few ‘quickfire’ ideas based on that:
- Diverter app
There’s an iPhone app called ‘Diverter’ that does a very sneaky but useful thing:
It allows you to dial a random phone number, and then redirects that call to a predetermined phone number instead (without it looking like it).
(if you don’t have an iPhone, I believe ‘The Stranger’ does a similar thing for Android)
So we could have our spectators pick a ‘random’ phone number, and then call that number—which will actually dial a friend.
There’s a bunch of ways you could use this, but here’s how I think you could use it in combination with the ‘secret’ identity of the cards in the stack.
I would start by openly saying:
“I’m going to call my friend.”
In fact, if you perform as a duo act—you could have your friend leave the building so there’s no way he could know the card beforehand.
You then dial the phone number, letting the audience see you dial. In fact, you’re going to dial a fake phone number, and the last two digits of the phone number are going to be the stack number of the chosen card.
But perhaps I’m getting ahead of myself.
First, we need a card to be chosen. We’ll spread the deck and let an audience member take a card out, cutting the deck at that point and glimpsing the bottom card.
We now know the identity of the card. Let’s say it’s the 9C—the 44th card in the stack.
We would dial a fake phone number that ended ‘44.’
Here’s the missing piece of the puzzle:
You have an assistant ‘backstage’ who notes the number you dial, and texts your friend the name of the card based on the number. So they see ‘44’ (and if they can’t see, you can call out the numbers as you dial them) and text your friend ‘9C.’
Now you can call your friend, and your friend can name the card—without you saying anything!
Now, that’s an interesting idea—but it’s somewhat clunky due to the fact you need an accomplice.
However, what it DID do for me was spark the next idea, which was…
- Card to wallet
This is still one of my favorite ideas. I love it.
We start with a spectator selecting a card, as in the previous trick, and you glimpse the key card in the same way. Get them to replace it where it came from.
While this is happening, your friend is absent from the room.
Now, you’re going to remove a wallet from your pocket. But as you do so, you’re going to ‘load’ it with a certain amount of loose change.
Here’s the change I would carry (this is UK money, so you may need to do a little ‘currency conversion’)…
1 50p
2 20p
1 10p
1 5p
5 1p
Using those coins (a grand total of 10 coins) we can create any number from 1 – 52.
17? 10p, 5p, two 1ps.
22? 20p, two 1ps.
48? Two 20ps, one 5p, three 1ps.
31? 20p, 10p, 1p.
And so on.
And if we have those coins organized in our pocket, we can quickly pick them up and load them in the wallet prior to pulling it out.
(I’ll leave the particulars of how to you, since your wallet likely differs from mine.)
When we do take out the wallet, we then call our friend back in the room.
(or call the friend back in and load the coins during the misdirection that provides.)
We hand them the wallet and ask them to “show everyone there’s no card inside.”
They open the wallet so everyone can see its contents, and the lack of a card. Actually, they’re taking note of the amount of change. If they saw two 20ps and three 1ps, they’d know the number is 43—and the card is the AC (43rd card.)
Now, they know the card.
We bring attention back to the deck as we give it a shuffle. Actually, since we had them place it back where it came from, we can estimation cut it to the top and then false shuffle. We then palm it out, and reveal that it has vanished from the deck.
Meanwhile, your friend has removed the AC from a pocket index and loaded it in the wallet (I’m assuming you’re using a magic wallet built for the ‘card to wallet’ effect.)
When you return to the wallet, you can show that the card has magically appeared inside.
That’s a neat little thing, although it will require a decent palm.
Here’s the next idea that this one sparked…
- Safe
If we placed a ‘safe’ on the table, we could do something with the combination lock.
The selection procedure is the same as the previous idea. This time, we reveal the identity as we open the safe—the first two numbers we input on the combination lock is the stack number of the card. We then reset the lock and enter the real combination. That or we get the combination wrong on the first time, and do it again.
We open the safe to show it’s empty.
Then we palm the card out of the deck while your friend retrieves the chosen card from a pocket index and loads it into the safe.
Of course, this would require a gimmicked safe. That or your friend would need to open the safe with it facing him, and then ‘retrieve’ the card from inside—the same card that he had palmed.
I’m not sure. Really, this was just a fun idea, I have no idea how doable it is.
But it did prompt this idea, which is more usable…
- Phone pin
The idea of using a combination lock to reveal the number made me think about this one.
Selection procedure is the same as ever.
This time, once our friend is back in the room, we ask them to “write the name of the card down.”
They don’t have any paper, so we’re justified in handing them our phone. As we do so, we unlock it.
However, the first two numbers we input on the passcode section communicate the stack number.
So I might hit ‘4354’ as my passcode, which will obviously buzz, since it’s wrong. Now enter your real passcode, or use touch ID to unlock. This should be done fast, and casually.
They can now write down the name of the card in your notes, and turn the phone face down on the table—ready to reveal at any time.
The idea of using an iPhone screen with numbers made me then think of this…
- Calculator app
Selection procedure is the same as ever.
Now we do some kind of calculation that ends in a number between 1 and 52.
I would start by inputting two numbers on the calculator (or 4 digits, but the first 2 communicate the stack number) and then asking for the spectator to add their input too.
We get them to keep on adding, subtracting and multiplying until the number is between 1 and 52. (we can openly tell them this.)
Then, your friend removes a deck and counts to that number. The card on that number is the named card.
Of course, your friend gained the identity of the card the minute you started the whole calculation process. Once you gained the final number, they had time to estimation cut the card into position (see the ACAAN section of Module 5.)
Here’s another fun idea sparked by the idea of using a calculator…
- Toxic
If you know the ‘Toxic force’ using the iPhone calculator, you can force the stack number.
So you can have the spectators do all the calculations, but when you hit ‘=’ you’ll get the stack number.
(perhaps make sure the answer is something like 43.332 so it looks accurate. You’ll also want to make sure the spectators aren’t paying too much attention to the actual maths of what’s going on. That said, make sure the preceding calculation is within some kind of reason. 3434 divided by 98 makes more sense equaling 43 than 3434 divided by 2.)
You could then have the spectator count to that number in a deck you placed aside from the beginning, and find their card at that number.
Now, you may have noticed that this idea is completely different from the other stuff we’ve been doing—it’s not a duo routine.
But that’s what happens with this creative process. Sometimes one idea sparks another idea that is only barely related to the original idea!
That said, I did manage to get back on track with…
- Calendar
There’s been some work done already on using a calendar combined with a stack, but here’s one idea:
Selection procedure is the same.
You then pull out a calendar (don’t ask me where you were storing it. Perhaps it’s a pocket calendar.)
You open it up and ask them which month their birthday is in. When they tell you, flick to that month.
Now get them to tick the box with their birthday. While they do this, you hold the calendar steady. In fact, your thumb is on the box that equals the stack number of their card. For example, if their card is the 6H, your thumb covers the ‘24th’.
If their card is higher than 30 (or 28, if their birthday is in February) we just use both thumbs.
If their card is the JS, we’d have one thumb on the ‘30th’ and another on the ‘15th.’
If the locations are awkward to get to, just briefly cover them with your thumb as you take the calendar back.
In all honesty, I’d need to play around with this a little more to figure out the exact correct placement for your fingers, but that’s the basic idea.
Which then prompted this idea…
- Pocket index
Now, this was a weird one. If anything, this should have been the ‘starting’ idea that we built on. I’ve no idea why it took me this long to think to write it down.
This one requires just you. You glimpse the key card as before, and let them return their card. You then retre
As I said, this is nothing fancy and I’m not sure why it suddenly cropped up here, but that’s how it happened in my mental process, so that’s how I’ve recorded it.
Thankfully, my next idea was a little better…
- Multiple selections
It then occurred to me that many of the previous methods would allow us to communicate multiple cards. For example, we could get a good 5 cards within the phone number (5 sets of 2, although you might make that 3 sets of 2 if you want to use a legit area code).
This also applies to the safe, phone pin, and calculator idea (and perhaps more if you find a way.)
This idea then made me think of…
- Stopwatch
Selection procedure same as ever.
This time, we give our friend ‘60 seconds’ to find the card in a shuffled deck (actually, it’s stacked.)
We start the countdown. We then pause the countdown at the second that signifies their card.
For example, we’d hit pause at 43 seconds.
Why pause?
Like Michael Ammar does in Rollover Aces, this can be to reiterate the difficulty of what’s going on, or add tension. Depending on WHEN you pause, this patter might vary.
Either way, once they know the number they can find the card in a manner of seconds (they can then keep it on top throughout a series of false shuffles so they can find it at the ‘last second’ for dramatic purposes.)
I liked this idea at first, then realized the big difficulty is making sure you hit ‘pause’ on the exact second.
Rather than throw the whole idea away, I would just change it slightly.
When you hit pause, your friend treats that as if it’s the card (even if it’s not.)
Then, rather than produce the card, we say they’re going to place it in a special position.
Once they name their card, it’ll either be the top card, bottom card, or second from top/bottom, which we can reveal with a double lift/glide. If it’s 3rd we can use triple lift or double glide. That gives us a margin of 6 seconds on the pause.
This then prompted my next idea…
- Elevator
This is now getting admittedly crazy, but no less fun.
I figured, if for some reason we’re performing for someone in an elevator, and we have a couple of friends handy, we could do the following:
Get them to pick a card, and we glimpse. Then we press the buttons on the elevator to go up. In fact, we’ll press the two numbers that give us the stack number. Our friend is in the elevator too, and he notes that number.
He gets off at the first stop, and we stay in.
He then greets a second friend, who’s waiting near the stairwell. He tells the second friend the name of the card. The second friend takes the stairs and enters the elevator at the next stop. He then reveals the name of the card to our spectator.
Wow…that sounded crazy in my mind—and even crazier when I wrote it down!
This is no doubt an ‘imagination only’ trick, but that doesn’t make it any less fun.
And either way, as I said, you want to write this stuff down because it’s all part of the process.
Doing so led me to the next idea…
- Thumper
This isn’t my area of expertise, but it seems to me one could use a thumper to communicate the card—sending the first number (4 thumps) then the second (a break, then 3 thumps.)
Again, this was just a random idea that is out of my realm of experience.
However, it did spark THIS idea…
- Phone battery
Selection procedure is the same as ever. This time, after you know the card, you open your phone
You’ve previously screenshot your lock screen with 52 different battery percentages. Go onto your photos and swipe to the battery percentage we want (43% in this case) and place the phone face down.
(how do we hide this? Perhaps do it with your back turned as you ask them to “show the card around, but don’t let me see.” An oldie, but a tried and tested method.)
Now ask your friend to type their prediction in your notes. As you pick up the phone, they glimpse the battery. Then you turn it off and back on again and unlock it for real, letting them type the name in the notes.
By this point I was starting to reach the end of the line for this particular session.
I’m sure there are more possibilities out there, but I think that’s enough to give you a picture of what that creative process can look like sometimes…
NOTE: I was pleasantly surprised to see that Danny Crauwels had a couple of similar ideas, found on ‘
While we were going through these ideas in the Live Session, we then had the crazy idea that there’s ANOTHER layer of ‘secret identity’ built into the deck.
After all, we’ve all learned the PAO list by now, right?
That list, when you think about it, is another secret identity.
We can then communicate that identity to our friend via either the person, action or object.
For example, if the card is the 9S, the action is scratching. We could just scratch our ear and that would reveal the identity to our friend.
Of course, we’d need to make sure they know WHEN we’re doing the action in advance (for example, if there’s an easy action, we decide in advance we’ll do it right after they replace their card.)
Often the action won’t be lowkey enough though. We could then look at revealing it through the person or object too.
I’d need to work out the particulars of this, but it’s a pretty rad idea.
In the session, we then started to jam on using that ‘extra secret’ secret identity within the Gilbreath Principle (i.e alternating the deck by American people and non-Americans) and performing a similar effect to the Which Hand effect in Module 5 (with the two piles organised in stack order but with one half all the Americans and the other half all the non-Americans.)
One Final Idea on thinking Unconventionally:
I mentioned in the Live Session that a good game to play for new ideas is to open classic magic books to a random page, look at the routine on that page, and then see how the mem deck might come in handy.
I didn’t do that on the Live Session, but let’s try that here.
I’ll let Greater Magic fall open to a random page.
Here’s what I got:

At first, it didn’t seem like I could do much with it.
Then I figured out a way to use the method in this as the second phase in a four phase ‘magician vs gambler’ plot that leverages the mem deck.
We’ll start in the Aronson stack and deal the four nines to ourselves (see Module 5 Poker Deals section.)
The only caveat is that we start by dealing to ourselves first (this keeps us set up for what comes later.)
As we do so, we present the ‘magician vs gambler’ plot. We say something along the lines of (although far more dramatic)…
“The gambler started by dealing himself a Four of a Kind.”
We then pick up the first packet following ours and replace it below the rest of the deck (we only need four packets for what comes next.)
Then we pick up those nines, and perform the second phase using a method similar to the one in the book (although I would use regular double lifts rather than using short cards), stopping after we’ve made the Nines ‘vanish.’
“The magician, unimpressed, made those Nines disappear.”
We then pick up the remainder of the deck and, for the third phase, cut at the AH and deal ourselves a Royal Flush in Hearts (see Poker Deals in Module 5.)
“The gambler retaliated by dealing himself the best hand possible, a Royal Flush.”
The fourth phase looks like this:
“The magician, not to be outdone, magically transformed his cards from a lousy hand into a Royal Flush in Spades.”
How?
Recall the packet we placed on the bottom of the deck after the first phase?
Well, the beauty of the Aronson stack is that the pile you dealt second during the first phase is actually a Royal Flush in Spades. We placed that pile on the bottom of the deck. After dealing the Royal Flush in Hearts, the only cards left are the Royal Flush in Spades and three indifferent cards.
So we can display the second hand after doing the second round of dealing—which will be a lousy hand.
Then, as the audience reacts to the Royal Flush in Hearts, I would start gathering up the cards, then stop, as if the decision to do another phase was made in the moment. In the motion of gathering, we’ve moved the cards with the Royal Flush into the position previously held by the Pair. I would turn the hand face up and spread, hiding the indifferent cards beneath the last card of the spread. That or start the routine with those cards removed from the deck already.
After some time delay, we can reveal the hand.
Perhaps there’s a better way of handling this switch. I think the visual confusion of two rounds of deals give us enough cover for a bold one like this, but you may have a better idea.
NOTE: This is actually an important lesson. When writing this out, I couldn’t immediately think of a way to switch the packets—but I didn’t let that stop me, because I knew it IS possible in theory. Don’t let your lack of technical knowledge stop you from creating something that is possible (you just don’t fully know how yet—you just know it can be done.)
Those details can be ‘plugged in’ later. They’re not the most important part.
NOTE: make sure to be false shuffling the cards between deals.
One more to prove this isn’t just luck…
Pg 293 – 295 of Greater Magic:
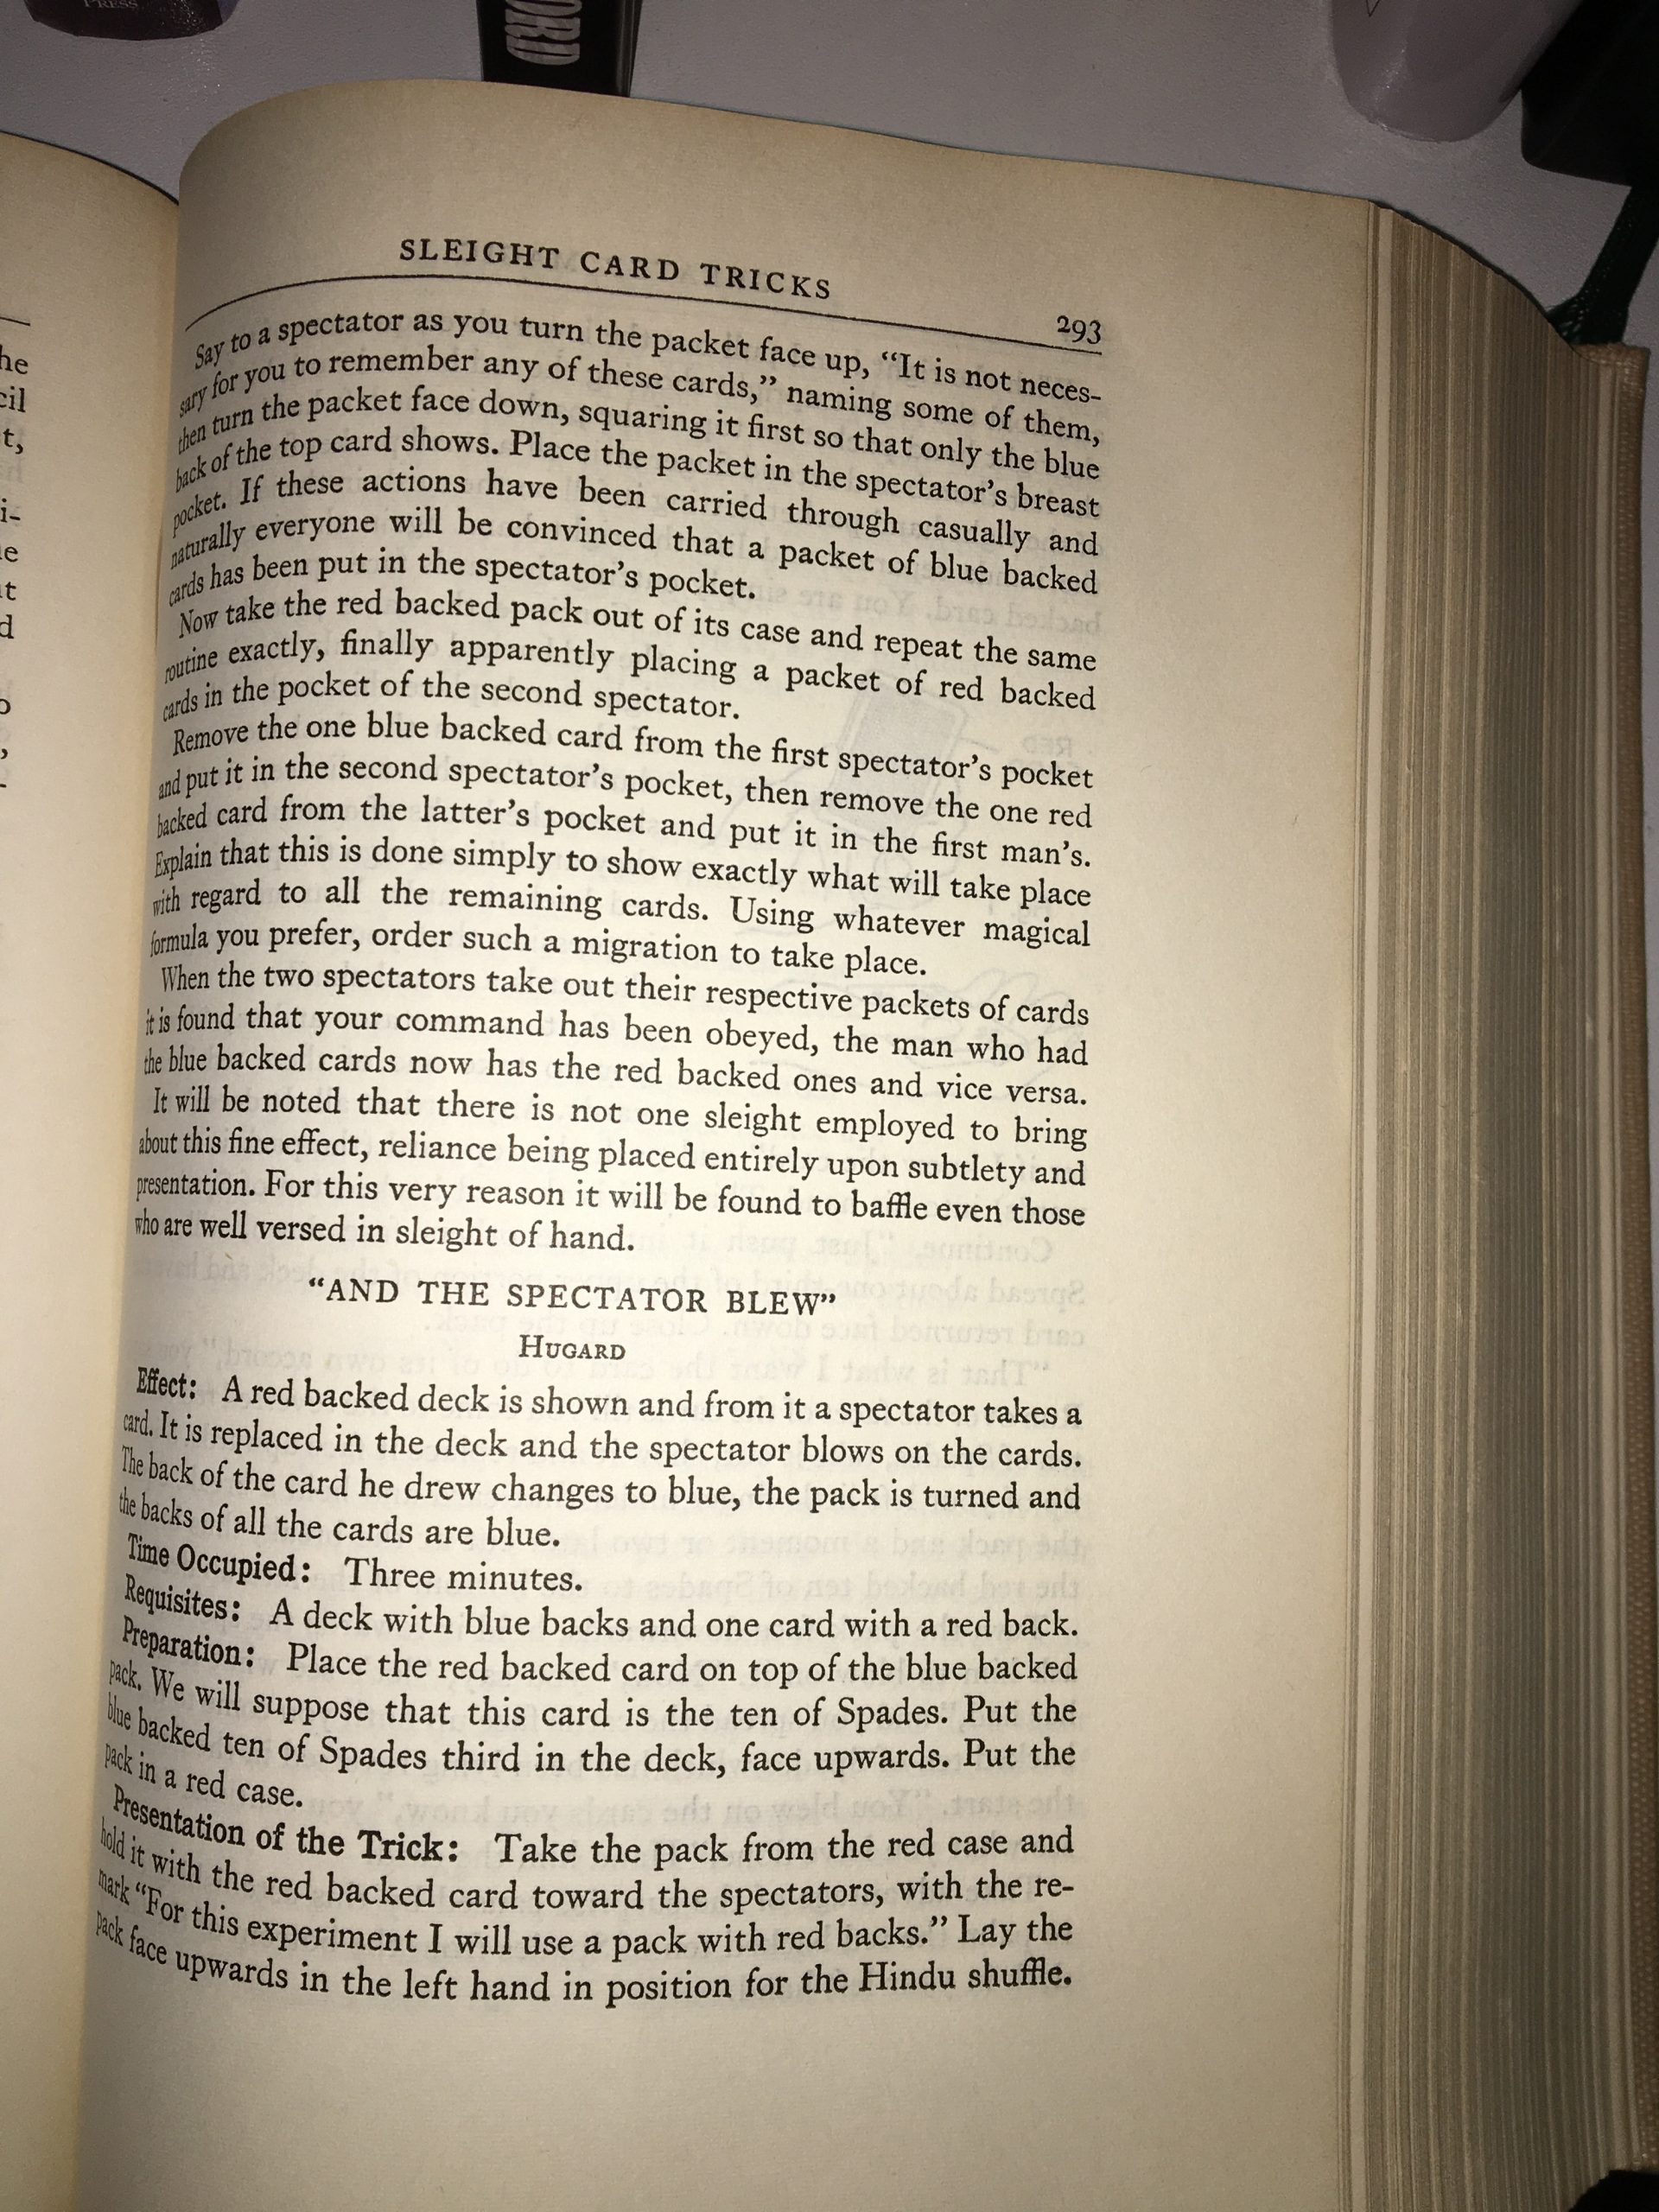
I think we can make this stronger by using a ‘named card’ rather than a forced card.
We start with a blue deck, with a red double backer on top.
We do the ‘display’ procedure as detailed in here (although I would refrain from constantly saying “red” and let the cards speak for themselves.)
We then ask someone to name a card. Once they do, we estimation cut it to the bottom and reverse it (using a half pass, or simple reversal.)
NOTE: We do this whole thing with the deck face up. This idea comes from an ‘Invisible Deck’ routine by Aaron Fisher. So we estimation cut the card to the bottom of the face up deck, and then do the reversal there (when I say bottom, I mean the NEW bottom—we definitely don’t want the named card on the face of the deck. When doing this, it’s safer to overshoot, so the card is somewhere near the bottom and can be corrected by double undercutting cards from bottom to top rather than the other way around—which would expose the card. (again, bottom just means the NEW bottom and top means NEW top.)
NOTE: The nice thing about doing this estimation face up is that we can start by flipping over the deck and doing a reversal on the double backer—which will prevent us from having a blue card smack dab in the middle of the deck when spreading later.
NOTE: You’ll need some patter to go along with the estimation process.
We then cut their card to the middle and ask them to blow on the deck (or change that up, I’m just going from the book.)
We show them the result:
As we spread the face up deck, there’s one face down red card. We reveal it to be the named card.
Then, as the book suggests, we say something like:
“I think you blew a little too hard…”
And we proceed to reveal the rest of the deck has also changed color.
It’s a fun thing, and while some might contest it would be stronger if the deck hadn’t changed color (brainwave deck style), we’re just working from the original presentation here. And either way, it’s a powerful effect.
Saying that, if we did want to perform a brainwave effect with the deck, Asi Wind has a nice one called ‘Out of The Blue’ in his book, Repertoire.
Now, you don’t have to necessarily LIKE any of the routines on this page (although I think there’s a couple of pretty cool ideas).
The important thing is that we started with something absurd and seemingly unrelated to the memorized deck, and ended with a perfectly valid effect that utilised that prop and the memorized deck in a logical way.
That’s the key lesson.
Before we move on, let me just remind you why we’re doing all this in the first place.
Imagine building a skyscraper—paying for land, hiring contractors, spending millions on construction—and then, once it’s constructed, only ever taking the elevator to the fourth room on the left on floor 24.
If that’s the only thing you ever used the Skyscraper for—while you may technically get done what you need to get done—it would be a tremendous waste of time and money.
Some people do a similar thing with the memorized deck. They put in all the hard work of memorising it, learning how it works, building it up—and then they only ever use it for ONE effect.
And while that effect may be perfectly valid, in my opinion it’s a shame NOT to explore the rest of your skyscraper and see what else it can do for you!
This is why thinking unconventionally can be powerful—it allows you to explore areas of your skyscraper that most people don’t.
Now that we’ve learned that, let me proceed with a word of warning…